Panel Installation
Installing the panels seemed like it would be real simple: drill some holes, bolt the rack on, and then bolt the panels on. Yeah, seemed...

The Rack
The original design for the rack called for standoffs holding extensions allowing the mounting of the panels at the optimal angle for winter rays. I was not aware that, when we scrapped the angle mounting idea, we also switched from standoffs to L-brackets. The installation of the rack would not have been any easier with the standoffs but it would have been a little straighter.
I would like to note here that for three days, nearly all the work was done on my own. This meant finding creative ways to do two-person jobs. One of these, pictured below, shows the leftover pieces of wood that my Dad usually uses for kindling. The pieces are stuck in the rain gutter allowing me to shove the rack rails up on the roof all alone. The second part they served was to mark where the rafters were so that when I drilled through the corrugated metal, I hit wood and not air.


The image above on the right shows the redwood rafters of the barn. Though quite sturdy, their diameter changes depending on the log and depending on where along the log. This made the use of lag bolts impossible. Well, it would have been possible if I could have found some that were threaded all the way but the only bolts I could find had only one inch of thread at the ends. Since I could not tell how long each spot would be until I drilled it and I didn't want to drill it until I had the bolts, I switched to all thread.
I used a chalk line to mark the rafters and a lot of tape measurer work to figure out where to drill the holes. Although the system I installed is off the grid, the power lines were only 50' away and I took advantage of that since I had forgotten my cordless drill in Arcata.

After getting the all thread setup and having my Dad pickup more parts on his way home, we worked together to mount the L-brackets solidly. I had bull-nosed pliers and he had a wrench. I was on the roof applying anti-seizing compound, sealing calking, and holding the all thread still with bull-nosed pliers. I would tell him when I was ready and he would tighten until I told him to stop.
Below you can see or rather kind of see the ground wire running from the bolt in the roof. This wire runs down to the ground rod. I decided that this was adequate grounding of the panels since the bolt touched the roof and the rack and all three are made of metal. We later noticed a spot on each panel frame for mounting a ground wire. We decided to finish the installation and ask about it later. To my knowledge, we haven't asked anyone yet. heh.


Conduit!
While I worked on mounting the rack, my Dad measured and cut conduit to hold and protect the wires of the system. Not only does the conduit protect the wires from all the dust in a barn full of hay, but it looks way more professional. Sweet! Unfortunately, in order to install the conduit, we had to rewire everything. The positive side was I felt much better about the wiring the second time and I didn't shock the hell out of my finger.


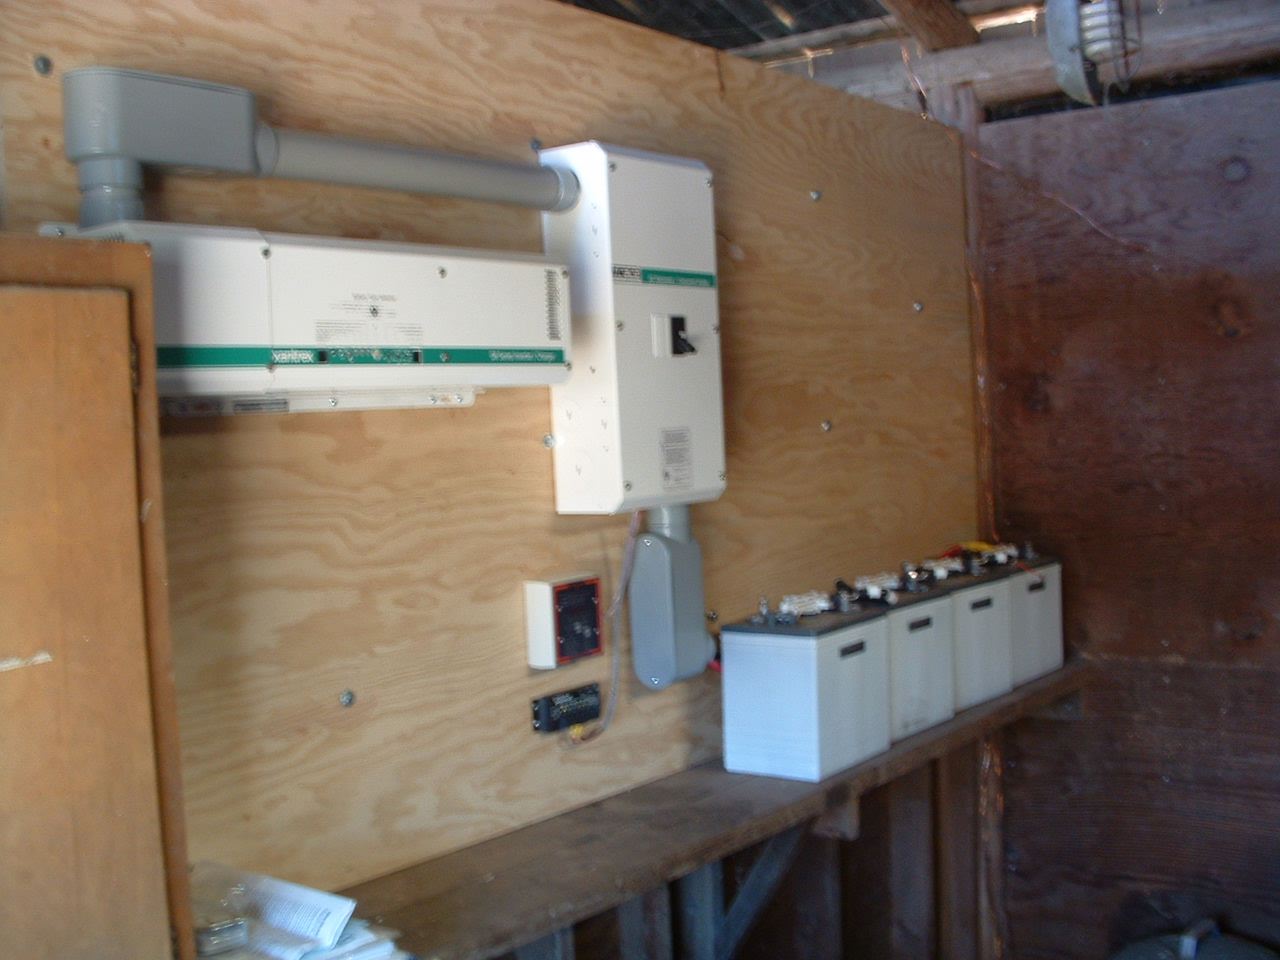
Charger
There are six places to attach wire to the charger split into three pairs. The far left spot is for the incoming from the solar panels. The middle pair is for the outgoing to the batteries. The far right pair are for the DC load. However, our DC load goes through the DC Disconnect so this charger is used only for charging. At this point in the installation, the battery wires are done.
 
Panel Mounting
Next came the solar panel mounting; kind of a fun capstone experience. My Dad handed each panel up to me and I made sure they were attached nice and tight. Following are a few photos of that sequence.


Panel Wiring
While I wired the panels together, my Dad used cable tacks to neatly run the wires down and around and over and under and where ever to reach the charger.


I reattached the batteries and then, just before attaching the panels to the wire, I wanted to test the voltage across them because I was excited about it. 80 volts! Wait, that can't be right. I remembered a charger manual saying not to exceed 48 volts.

After a consulting call to the Solar Living Institute, I returned to the roof to change the four panels from 4 in series to two pairs in parallel. The new voltage measurement came in at 39 volts. Perfect! Actually, if you look close enough, you can see the 39.0 reading on the multimeter. So I attached the solar panel leads to the charger and the green charging light came on. A few seconds later, the TriMetric meter indicated the voltage was rising and after a short time, the batteries were up to 28 volts from 24.
For a time I was happy with the completed project and thinking about returning home. I said hi to the two primary occupants of the barn, Poppy the horse and Scooby Doo the pony. I also took time to pet the resident not in the photo: Brownie the barn cat.


|